Usb Format On Mac For Windows 10 Install
Your Mac will need to be able to run Windows and you'll have to buy a. If you bought a physical version of Windows 10: The flash drive option tends. To format the Boot Camp partition so that it can install Windows correctly. Dec 30, 2019 How to Install Windows 10 on a Mac. This wikiHow teaches you how to install Windows 10 on your Mac using Boot Camp. Before you can install Windows 10 on your Mac, you must first download the Windows 10 installation file from Microsoft's.
Boot Camp Assistant User Guide
You need an external USB drive to install Windows on older Mac computers. To find out whether you have a Mac that requires an external USB drive, see the “Learn more” section in the Apple Support article Install Windows 10 on your Mac with Boot Camp Assistant. If your Mac is a newer model that doesn’t require a USB drive, follow the instructions in Install Windows on your newer Mac using Boot Camp instead.
What you need
The keyboard and mouse or trackpad that came with your Mac. (If they aren’t available, use a USB keyboard and mouse.)
A blank 16 GB or larger external USB 2 flash drive, formatted as MS-DOS (FAT).
To format an external USB drive as MS-DOS (FAT), use Disk Utility, located in /Applications/Utilities. In Disk Utility, choose View > All Devices, select the USB drive in the sidebar, then click Erase in the toolbar. In the dialog, enter a name for the drive, choose MS-DOS (FAT) from the Format pop-up menu, choose Master Boot Record from the Scheme pop-up menu, then click Erase.
A full-installation, 64-bit version of Windows 10 on a disk image (ISO file) or other installation media.
You can download a Windows 10 Disc Image (ISO File) from Microsoft.
Sufficient free storage space on your startup drive. For information about the amount of free space needed, see the Apple Support Article Install Windows 10 on your Mac with Boot Camp Assistant.
Before you begin
Before you install Windows, make sure you back up important files.
You can use Time Machine or any other method to back up your files. For information about backing up files, see Back up your files with Time Machine and Ways to back up or protect your files.
Perform the installation
Do the following steps in order.
Step 1: Check for software updates
Before you install Windows, install all macOS updates.
On your Mac, log in as an administrator, quit all open apps, then log out any other users.
Choose Apple menu > System Preferences, click Software Update, then install all available updates.
If your Mac restarts after installing an update, open Software Update again to install any additional updates.
Step 2: Prepare your Mac for Windows
Boot Camp Assistant prepares your Mac by creating a new partition for Windows named BOOTCAMP and downloading the Boot Camp support software.
Important: If you’re using a portable Mac, connect it to a power source before continuing.
Connect an external USB drive or insert a flash drive into the USB port on your Mac; keep it connected or inserted while you install Windows and the Windows support software.
On your Mac, open Boot Camp Assistant , located in /Applications/Utilities.
At the introduction screen, click Continue.
The system is checked for total available disk space. Older Time Machine snapshots and cached iCloud files are removed to make space for Boot Camp. This process may take a long time to complete (you can click the Stop button to skip this process).
At the Select Tasks step, select all the tasks, then click Continue.
At the Create Bootable USB Drive for Windows Installation step, choose the Windows ISO image and the USB drive, then click Continue.
The Windows files are copied to the USB drive. This process may take a long time to complete (you can click the Stop button to interrupt this process).
At the Create a Partition for Windows step, specify a partition size by dragging the divider between the macOS and Windows partitions. If you have multiple internal hard drives, you can select a different hard drive from the one running macOS and create a single partition on that drive to use solely for Windows.
Click Install.
When this step is complete, the Windows installer starts.
Step 3: Install Windows
In the Windows installer, follow the onscreen instructions.
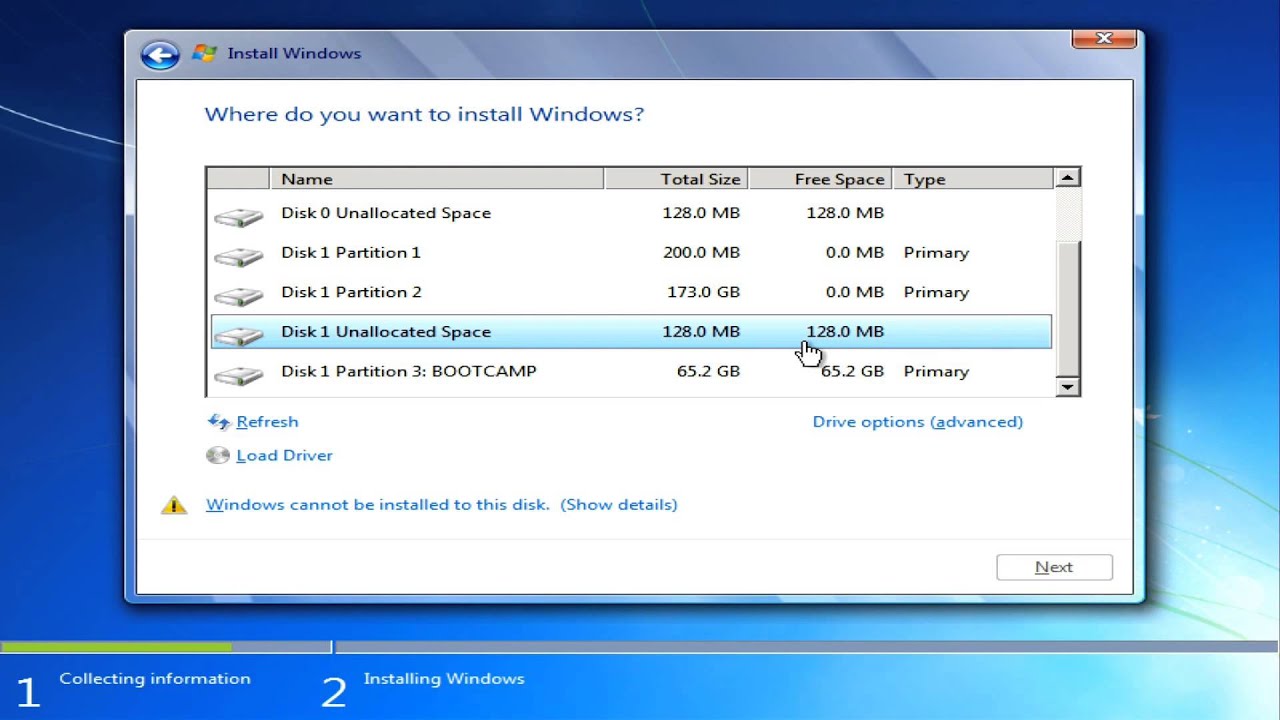
When you’re asked where to install Windows, select the BOOTCAMP partition (you may need to scroll through the list of partitions to see it), then click Next.
WARNING: Do not create or delete a partition, or select any other partition. Doing so may delete the entire contents of your macOS partition.
Continue following the onscreen instructions to finish installing Windows.
After you install the Windows software, your Mac automatically restarts using Windows.
Follow the onscreen instructions to set up Windows.
Step 4: Install Boot Camp on Windows
After installing Windows, Boot Camp drivers that support your Mac hardware start installing.
Note: If the support software doesn’t install automatically, you need to install it manually. For instructions, see the Apple Support article If the Boot Camp installer doesn't open after using Boot Camp Assistant.
In the Boot Camp installer in Windows, follow the onscreen instructions.

Important: Do not click the Cancel button in any of the installer dialogs.
If a message appears that says the software you’re installing has not passed Windows Logo testing, click Continue Anyway.
You don’t need to respond to installer dialogs that appear only briefly during installation, but if a dialog asks you to install device software, click Install.
If nothing appears to be happening, there may be a hidden window that you must respond to. Look behind open windows.
When the installation is complete, click Finish, then click Yes to restart your Mac.
After your Mac restarts, follow the instructions for any other installers that appear.
With a growing number of companies allowing employees to “BYOD” (Bring Your Own Device), more and more people are buying Macs. Some of those same companies require their employees to also be able to run Windows on their Macs. There are virtual machines that can run on Macs such as Parallels Desktop, but in my experience none run quite like “real” PCs, even on fast Macs. Fortunately, Apple has long supported a way of running Windows in a partition on a Mac, creating a dual-boot computer that can run both Mac OS X and Windows. In this Tech Tip, I’ll show you how to install Windows 10 on a Mac using Boot Camp.
Remember, you might not need to install Windows on your Mac in order to run compatible applications. Microsoft Office was often cited as an excuse why companies needed to have employees use Windows, and the newest Mac versions are surprisingly similar to those on Windows. However, if you need apps such as Microsoft Access or proprietary apps that don’t have Mac equivalents, Boot Camp is the most compatible and speedy way to run those apps.
What You’ll Need
- A valid license for Windows 10
- A 32GB USB flash drive (if you’re installing Windows on a multi-drive Mac)
- A Mac with space for a Windows partition that fits Apple’s requirements to run Windows 10 (check the list at the bottom of this page for a complete list of compatible Macs) or a second drive.
Making an install USB disk for a multi-drive Mac
Heeding Apple’s advice, I used Boot Camp Assistant on a Mac running OS X El Capitan to create a USB flash drive Windows Installer disk. To do this, I first downloaded a Windows 10 ISO disk image from this Microsoft web page into the Download folder. Boot Camp Assistant can be found in the Applications > Utilities folder. Once launched, the app displays a screen with three options:
Next, I launched Boot Camp Assistant, checked the first two options — “Create a Windows 7 or later version install disk” and “Download the latest Windows support software from Apple”, then clicked Continue. The next screen (see screenshot below) has you select the location of the Windows ISO image and the USB flash drive as the destination to create a bootable USB drive for Windows installation, and then click continue. The process of moving the Windows files from the ISO image file to the USB drive and downloading the necessary support files and saving them to the installer drive can take a while.
Creating a bootable installation USB drive using Boot Camp Assistant
Installing Windows on a Single-Drive Mac
If you’re installing Windows on a Mac with a single drive, things are much easier. Just download the ISO image, launch Boot Camp Assistant, and you’re greeted with the following window:
Select the location of the ISO image (probably in the Downloads folder), choose a partition size for Windows by moving the slider between OS X and Windows left or right, and click the Install button. You may still be asked to download the Windows support software from Apple on another screen before the installation proceeds.
Installing Windows 10 from Boot Camp Assistant
Once the bootable installation USB drive has been created for a multi-drive Mac, quit Boot Camp Assistant, then launch it again. This time, check the last box — “Install or remove Windows 7 or later version” — then click Next. Note that you should not need to perform this task on a single-drive Mac.
Your Mac restarts, and you’ll see a very DOS-like message telling you that the machine has booted from the Boot Camp-created USB drive if that’s what you’re using. Soon the screen will turn purple, and show a message that says “Setup is starting”. Select the language, time and currency format, and keyboard type, then click Next.
This PC-linked smart card reader boasts of greater speed than any of its predecessors. ACR39U is the ideal peripheral for your smart card solutions. EMV Level 1 and PBOC-certified, it is ideal for e-banking, and e-payment applications. Cac reader software for mac. This plug-and-play USB device is also compliant with PC/SC and CCID specifications, runs on various operating systems such as Windows, Linux and Mac, and may even be used with mobile applications running on Android™ 3.1 or higher. It also covers a broad array of applications by supporting ISO 7816 Class A, B, and C smart cards; microprocessor cards with the T=0, T=1 protocol; and a wide variety of memory cards, including the US Department of Defense Common Access Card (CAC).
You’ll be asked to activate Windows (see image below). With your licensed copy of Windows you’ll have a card or sticker with a 25-character product key code. Type it in, then click Next.
Enter the product key to activate Windows
A screen appears asking what operating system you wish to install (see image below). In my case, it was the 64-bit (x64) version of Windows 10 Home that I had purchased, so I selected it and clicked Next. You’ll need to accept the license terms by checking a box on the next screen, and then you can click Next one more time.
The next window asks where you wish to install Windows, and shows a list of drives and partitions. Boot Camp will have created a partition that is labeled BOOTCAMP. Select it, and then click the Format button below the list. This formats the drive in the Windows NTFS format, making it ready for the Windows installation. Finally, click Next one more time. Note that these steps may be bypassed when installing Windows into a partition on a single-drive Mac.
Selecting the BOOTCAMP partition in which to install Windows 10
This begins the installation of Windows, copying files, installing features and updates, and then finishing up. As with the creation of the bootable USB drive, this can take a while. Eventually your Mac will reboot into Windows 10, showing that it is “Getting devices ready”, then rebooting again. At this point, your Mac is a Windows PC, and will go through the process of setting itself up to use the Cortana intelligent assistant, asking you your name and password, and so on. Finally, Boot Camp runs itself on the Windows PC (see image below). Just click Next, accept the terms of the Apple license agreement, then click Next one more time.
If you have any other third-party devices to install, be sure to download and install the necessary Windows drivers for those after Windows is up and running on your Mac. You’ll also want to make sure that Windows Defender is set up, that you check for and install recent Windows updates, and install any apps you’re going to use on your Windows device.
Switching Between Mac and Windows
Once everything is up and running, it’s a quick process to switch between your “two computers”. When your computer is running OS X and you wish to run Windows, just restart while holding down the Option key (Alt key on a Windows keyboard). After a few seconds, the available boot drives appear. In my case, there was one for El Capitan, one for Windows, and the OS X Recovery Partition. Use the arrow keys to highlight the Windows drive, press Return/Enter, and the Mac boots into Windows.
Likewise, if you’re running Windows and want to get back to the sanity of OS X, choose Restart from the Apple menu, and hold down the Option/Alt key on the keyboard. Select the OS X drive and press Return or Enter on the keyboard, and OS X is loaded.
How long does it take to switch from OS X to Windows 10? I timed it on a Late 2012 Mac mini Server, from selecting Restart to time I first saw the Windows login screen, and it took 1 minute and 39 seconds. Going from Windows 10 back to OS X? Just 58 seconds.
If you absolutely need to have Windows and OS X running simultaneously so that you can cut and paste between the operating systems, then I highly recommend one of the virtual machine environments described at the beginning of this post.
Get more tricks and guides from the Rocket Yard’s Tech Tips section!